3ds Max 2027 and Maya 2027 plug-ins coming soon
READ MORE

Blending Content to Shape Your Lights

HDR Light Studio / Features / Blending Content to Shape Your Lights

A video showing the Main content tab and the range of content types available to choose from.

Main


Every light gets its appearance from content - either images or procedural shaders that define how it looks. The three tabs in the Appearance panel let you layer up to three pieces of content together, each one playing a distinct role.

The Main, Value Blend and Alpha Multiply content tabs in the Appearance panel

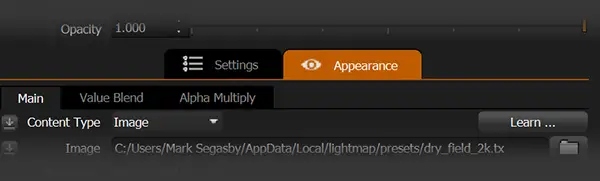
Main is your primary content. It drives the full appearance of the light, carrying RGBA information - that's colour, brightness, and transparency all in one. For many lights, this tab is all you'll ever need. On this tab you will find all content types are available to choose from.

A video showing Value Blend combining a softbox image with a Scrim to produce a controllable graduation of light while retaining the texture of the softbox.

Value Blend


Sometimes you want the detail and texture of one content source, but the brightness shape of another. That's what Value Blend is for.

A second piece of content is blended into the light's brightness - its values - using your choice of blend modes. The colour and transparency from Main stay in charge; Value Blend just shapes the light and dark.

A good example: use a softbox image as your Main content, then bring in a Scrim on the Value Blend tab. The Scrim gives you a smooth, controllable graduation or hot spot, while the softbox texture still comes through. You get the character of both sources working together.

A video showing the Polygon content on Alpha Multiply used to soften the edges and round the corners of a Scrim light.

Alpha Multiply


The Alpha Multiply tab lets you control the transparency of your light independently of the Main content. Whatever you put here gets multiplied with the alpha that's already coming from Main, cutting into it and reshaping where the light is opaque, soft, or fully transparent.

This is particularly useful for softening edges and rounding corners. The Polygon content is ideal here - pair it with a Scrim as your Main content and you get a light with smooth, shaped edges and no hard cutoffs.

A video showing two HDRI maps blended together using a gradient alpha on the top light to create a smooth horizon transition.

Blending HDRI Maps with a Soft Horizon


Another great use is cutting an HDRI map in half with a soft horizon. This makes it easy to blend two HDRI maps together - place one light above the other, and the gradient alpha on the top light creates a smooth, natural transition between the two.

A video showing an image used as a gobo on Alpha Multiply, combined with a Scrim on Main to shape the light of an area light.

Using an Image as a Gobo


Alpha Multiply is also great for loading an image as a gobo for an area light, blending it with a Scrim on the Main tab to combine the gobo pattern with a smooth light shape.

A video showing all three content slots in use - a blinds image on Main, a window with flowers on Alpha Multiply, and tree branches on Value Blend to create a window gobo effect.

Using All Three Content Slots


You can put all three content slots to work at once.

In this example, we begin with an image on the Main content to look like blinds, we have an image of a window with flowers in a vase on the Alpha Multiply, and an image of tree branches on the Value Blend to create the final window gobo effect. We then change the main content and try out a few different looks.

Main Features