Blog

Previs: Lighting a BMW Commercial with HDR Light Studio

Thanks to Matt Workman for letting us re-post this interesting article about his unique HDR Light Studio previs workflow for a video shoot.

Author: Matt Workman

In this article I walk through my process of lighting a “Social Videos Series” for BMW and the Super Bowl XLVII. First, visualizing the framing and angles in Autodesk Maya, then designing the lighting and reflections using HDR light Studio, and finally translating those results into a real world lighting set up.

INTRO / CONCEPT
In January 2013, producer Daniel Roversi @ KBS+ contacted me about a “Social Videos Series” for BMW. I was given several reference photos of what angles we were looking to capture and some basic CAD files of the cars. I collected a large sample of BMW renderings and photos from their previous campaigns as reference for lighting and framing. BMW is a very well known brand so I wanted the cars “read” as BMW and to stick with their overall lighting style.

“Part of the concept is the ability to react almost in real-time to events. We estimated, approved, pre-produced, shot and edited in 10 days.” It’s a new frontier in advertising where brands are in direct contact with their customers through outlets like Facebook, Youtube, and Twitter. When the Ravens won the Super Bowl the “Winner” spot was released within seconds.

FRAMING / ANGLES
Using the floor plans of the stage and some reference photos I had taken on the tech scout, I recreated the stage and cyc in 3D using Autodesk Maya. It was important that any angles and lighting setups I created in 3D could be possibly within the physical restrictions of the stage. After calculating where the camera would need to be for each angle (front, three quarter front, and profile) with Maya’s 3D camera I was ready to start lighting.

LIGHTING PREVIS

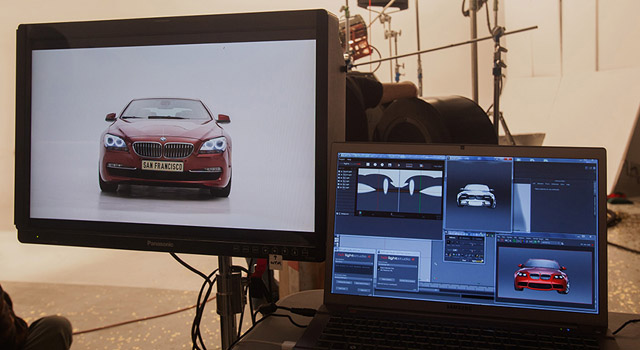
Previs for studio lighting with HDR Light Studio

LEFT MONITOR: Canon C300 live video tap, RIGHT LAPTOP: Autodesk MAYA running HDR Light Studio 4.0 + Maya Plug-in

My original digital lighting workflow was to create a single larger area light, move it around until it’s reflection landed where I liked in the hood, windshield, roof, etc. and then slowly tweak the shape, intensity, and quality. While amazing results can be achieved using this method, it requires a good amount of guesswork and a lot of time. Also, if you change angles or you change cars, you are effectively starting from scratch every time.

HDR Light Studio 4.0 eliminates all of the guesswork of placing and designing reflections. Using the new Light Paint feature, you can literally paint on the car where you want a reflection and HDR Light Studio generates and places the appropriate light in the scene for you. Using this new technique, I was able to create precisely placed reflections for each angle in fraction of time.

After I had created an HDR lighting plan for each angle of the car, I created an equipment list and several lighting diagrams to bring my digital lighting setup into the real world.

THE REAL WORLD SHOOT

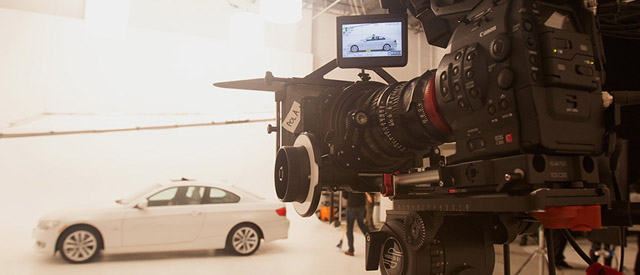
Shooting a BMW commercial

Canon C300 + Canon 30-105mm T2.8 Cinema Zoom Lens

For each shot, I walked through the lighting in HDR Light Studio with my gaffer Haroun and key grip Che. Because the angles and lighting model were based on the physical dimensions of the set and the car, translating the 3d lighting into reality was surprisingly intuitive. Both Haroun and Che, instantly had a feel for how to accomplish what was needed. After roughing in the lighting we’d compare our lighting with the render and make adjustments.

This was a challenging shoot, we shot 10 different spots in one day! Having pre-visualized the stage, angles, and lighting, I was able to work more confidently and efficiently. Thanks to our director Matthew Pizzano, producer Daniel Roversi, and our crew, we finished everything on time and on budget.